Making custom patterns for LayOut
June 10th, 2013 | Published in Uncategorized
The Basics
Patterns are made up of image tiles. When you assign a pattern to a shape, LayOut fills that shape with image tiles to create the pattern you want to see. The following picture shows this concept in action:
 |
| A sampling of patterns that ship with LayOut. Each is made up of image tiles which repeat to form the pattern. |
There’s nothing magical about image tiles in LayOut; they’re just JPG, TIF, GIF or PNG images. All of the pattern tiles we’ve included with LayOut happen to be PNGs because that format supports non-lossy compression (which makes them look good) and alpha transparency (which makes parts of them see-through). If you can, you should make your pattern tiles PNGs, too.
To add a pattern to LayOut, all you have to do is choose Import Custom Pattern... from the drop-down menu in the Pattern Fill panel. You can choose any image you like; LayOut will automatically turn it into a pattern by tiling it (copying it in a grid).
How does LayOut decide how big to draw each individual tile in the pattern? It looks at the source image’s resolution (pixel density) and uses that. Every PNG, JPG, TIF, and other raster image is saved with a resolution when it’s created. This is expressed in pixels per inch, or ppi.
Consider an image which is 1200 pixels wide by 600 pixels high. If this image is saved at 300 ppi, its physical size would be 4 inches (1200 pixels ÷ 300 pixels per inch = 4 inches) by 2 inches . If it were saved at only 100 ppi, its physical size would be 12 inches (1200 px ÷ 100 ppi = 12 in) by 6 inches. The higher the resolution, the smaller the physical size.
Example: A simple geometric pattern
 |
| A pattern composed of parallelograms, or hexagons, or cubes, depending on how you look at it. |
Let's make a pattern that looks like the one in the image above. This pattern is relatively simple to create for three reasons:
1) It has only one basic unit.
The “cube” is repeated over and over; there is no other shape.
2) It isn’t trying to look “random”.
Patterns that are supposed to look like a random distribution of elements are much trickier to create. I’ll cover them in a separate article.
3) It has no horizontal or vertical lines at its edges.
The following procedure isn't ideal for making pattern tiles that are made up of horizontal and vertical lines (like bricks and other rectilinear units). Those patterns, while common, are actually special cases that require a completely different technique to make sure they look right when they're tiled together. You can see three examples of these in this article’s first image, above. I'll outline that different technique in a separate article.
The technique that follows uses LayOut and Photoshop. While it’s possible to create pattern tiles using only LayOut (or even SketchUp, for that matter), Photoshop (or another image editor like GIMP) makes it much easier by providing pixel-level editing and tools for resizing raster images precisely.
Step 1: Use LayOut to manually draw a sample of the pattern.
LayOut is an obvious way to create simple pattern tiles like this one. The addition of SketchUp's Copy Array feature to LayOut in SketchUp Pro 2013 makes tasks like this one a lot easier.
 |
| Step 1: Start by manually creating an area of pattern. For something this simple, LayOut works well. |
Step 2: Outline a single tile with a rectangle.
Drawing this rectangle on a new layer makes it easier to turn on and off later on. Giving it a thick and brightly colored outline makes it easier to see what you're doing.
 |
| Step 2: Use the Rectangle tool to outline a single tile. |
Step 3: Fill the "tile outline" rectangle with a bright color and turn off its stroke.
This step makes it easy to crop away everything you don't need once you're in Photoshop. Choose a fill color that doesn't appear anywhere in your pattern tile.
 |
| Step 3: Convert the outlined rectangle into a filled shape with no stroke. |
Step 4: Duplicate the page and delete only the rectangle.
 |
| Step 4: Duplicate the page and remove the rectangle on the copy. |
Step 5: Export a PDF.
In your exported PDF, include both the page with the rectangle and the one without.
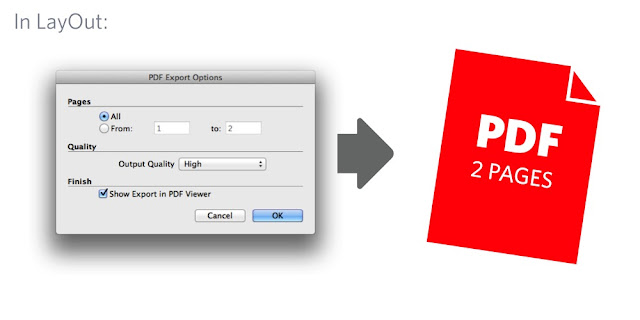 |
| Step 5: Export both pages as a PDF file. |
Step 6: Open the PDF in Photoshop.
In Photoshop, choose to open both pages of the PDF as separate image files. Set the image size to something quite large, like 5000 pixels wide. You'll downsample (make them smaller) later on.
 |
| Step 6: Open the pages of the PDF as separate Photoshop files |
Step 7: Copy / Paste one file into the other.
In the open file with the colored rectangle, choose Select > All from the menu bar, then choose Edit > Copy. Move to the other open file, then choose Edit > Paste Special > Paste in Place to create a new layer.
 |
| Step 7: Copy/Paste in Place the contents of one file into the other, creating a new layer in the second file. |
Step 8: Select the colored rectangle.
Choose the layer containing the colored rectangle, then activate the Magic Wand tool and click once on the rectangle to create a selection from it.
 |
| Step 8: Use the Magic Wand tool to select only the colored rectangle |
Step 9: Crop the image based on the rectangular selection.
Choose Image > Crop from the menu bar to crop the file based on the selection rectangle. Choose Select > Deselect when you're done.
 |
| Step 9: Crop the image, leaving only a single pattern tile |
Step 10: Hide the layer containing the colored rectangle.
When you hide the layer with the colored rectangle on it, you should be left with only a single pattern tile in your Photoshop file. Save the layered image as a PSD file.
 |
| Step 10: Hide the layer containing the colored rectangle. |
Step 11: Resize the file.
Choose Image > Image Size... to open the Image Size dialog box. Make sure the Resample Image checkbox is checked, and the drop-down menu below it is set to Bilinear. Type in a new width, in pixels, for your pattern tile, then click OK.
Note 1: If you create a very large pattern tile, you won't ever have to worry about blurriness or visible pixels when your pattern appears in LayOut—it'll be sharp as a tack. On the other hand, making your tile too large could bog down your computer; it all depends on how large each tile will appear, how many tiles LayOut will end up drawing, and how zippy your computer is.
Note 2: When it comes to digital images, there are some "magic" numbers to be aware of. They're the powers of two (2, 4, 8, 16, 32, 64, 128, 256, 512, etc), and using them makes it easier for your computer to resample an image when it needs to be displayed bigger or smaller than its native size. Making your pattern tile image width one of these numbers says to the world, "I know what I'm doing."
 |
| Step 11: Resize the image using the Image Size dialog box. |
Step 12: Change the image resolution.
Choose Image > Image Size... to open the Image Size dialog box again. This time, make sure the Resample Image checkbox is unchecked. The fields in the Pixel Dimensions area of the window should be uneditable.
Here, you're setting the physical size of the pattern tile on your page in LayOut. The value you type into the Width field is the physical width your tile will appear in LayOut when the pattern is set to 1x scale in the Pattern Fill panel. If you want an individual tile to be 0.5 inches wide in LayOut, enter that measurement into the Width field, and click OK.
 |
| Step 12: Change the image resolution (the pixel density) so that the pattern appears the correct size on your page in LayOut. |
Step 13: Save your image as a PNG file.
As I explained at the top of this article, PNG is the image file format that offers both lossless file compression and support for areas of transparency. Both are desirable qualities in a pattern tile, so PNG's almost always the way to go.
 |
| Step 13: Save the image tile as a PNG file. Giving it a meaningful name will save time in the long run. |
Step 14: Import your custom pattern into LayOut.
Back in LayOut, open the Pattern Fill panel (Window > Pattern Fill) and choose Import Custom Pattern... from the drop-down menu at the top. Find the PNG file you created in Step 13 and open it.
To make your custom patterns available in every new LayOut document you create, put them in folders on your system and use the Add Custom Collection... option from the drop-down menu in the Pattern FIll panel.
 |
| Step 14: Use the Pattern Fill panel to import your custom pattern into LayOut. |
In my next couple posts, I’ll outline techniques for creating pattern tiles that are rectilinear, ones that incorporate transparency, and ones that are supposed to look like a random distribution of elements. Stay tuned, and good luck.
Posted by Aidan Chopra, SketchUp Evangelist