Making an element appear on every page in LayOut
July 29th, 2008 | Published in Google SketchUp
As you know, LayOut is a great application for creating presentation documents from your SketchUp models. Using LayOut is relatively simple, but there are a few things about it that aren't obvious. One of these relates to creating elements (such as project titles and logos) that need to appear in the same spot on more than one page. Doing so requires that you understand something called shared layers in LayOut. Elements that you place on shared layers appear on every page that's set to display that shared layer. Here's how it works:
 the Layers dialog box
 the Pages dialog box
 the Layers dialog box
- In LayOut, choose Window > Layers from the menu bar to open the Layers dialog box.
- Create a new layer by clicking the "Add a new layer button at the top of the Layers dialog box. It looks like a little plus sign.
- Name your new layer "Multi-Page Elements" or "Same On Every Page", or something like that.
- Make your new layer a shared layer by clicking its "shared" icon. It looks like a little piece of paper, and it appears all the way to the right of the layer name in the Layers dialog box. When a layer is shared, its icon looks like a stack of pages.
- Be sure your new layer is active by clicking to select it (the selected layer has a little pencil icon next to its name) and create or add the element you'd like to appear on every page. Because the layer you're drawing on is now shared, anything on it will appear on all the pages in your document.
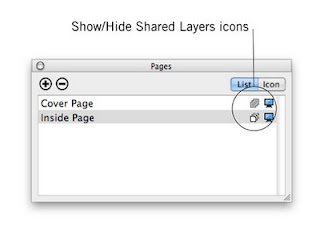
But what if there are some pages on which you don't want shared layer content to appear? Here's what you need to do:
 the Pages dialog box
- Choose Window > Pages from the menu bar to open the Pages dialog box.
- Click any page's "show/hide shared layers" icon (it looks like a little stack of papers) to set that page to show – or not show – elements which are on shared layers. When the icon looks "blacked out", that page won't show the contents of shared layers.