Analytics Demystified – Part 2: Setting Goals
May 29th, 2008 | Published in Google Grants
If you've already set up Google Analytics for your Google Grants account, you're ready to set goals and track the performance of your campaigns. If not, you can go through the setup steps in part 1 of this series to get up to speed.
A crucial part of using Google Analytics is to determine and set goals that can track the impact of your marketing efforts. While tracking traffic to your site is useful and eye-opening, setting goals lets you monitor the most crucial initiatives of your organization and make changes to improve their performance. You'll also get insight into your site's design and how you can improve it to suit your visitors' needs.
A first step in choosing goals for your Google Grants account is to think about what you're trying to achieve with your website. If your goal is for visitors to sign up for your newsletter or donate to your organization, you should set up corresponding goals in Google Analytics so that you can track the changes around these efforts.
As we discussed in a previous post, non-profits use analytics in interesting ways and track metrics that are unique to the non-profit market. Some goals that we often see non-profits track are:
- Volunteer sign-ups
- Newsletter sign-ups
- Research or report downloads
- Donations
- Information inquiries
Once you've determined your goals, set them up! A step-by-step guide for this process can be found in our Google Grants Analytics Guide (pg. 19).
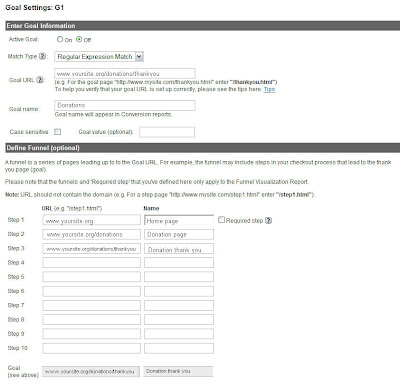
To set up goals:
- Login to your AdWords account and select the Analytics tab
- Click the Edit link under Settings next to the profile for which you want to create a goal
- Under "Conversion Goals and Funnel," select one of the four goal slots available for that profile, and click Edit

-
In the Goal URL field, type the web address that marks a successful goal completion when reached. This address can be the "Thank you" page that donors see after they've charged a donation or a confirmation page that visitors see once they've signed up for your newsletter.

- In the Goal name field, name the goal as you want it to appear in your Goal and Funnel reports. The name should be one you will easily recognize, such as "Newsletter Sign-Up" or "Donation."
- Turn on the goal by selecting the "On" radio button
- Define your funnel path. The funnel path is the path of pages that visitors click through on the way toward the goal you've set. If you're tracking donations, for instance, enter the series of pages visitors would visit before donating; this path could include the URLs for your homepage, your donation page, the shopping cart page, and your goal page

- Configure your settings by choosing "Case Sensitive," if your URLs are case-sensitive, and setting Goal Values if you've assigned dollar values to your goals. More details about this step are on pages 23 and 45 of the Google Grants Analytics Guide.
If you have any trouble, consult the guide's section on creating goals and funnels (pg. 15) or refer to the Analytics Help Center section on Goals and Funnels.
Next time we'll explain how data is divided in Google Analytics and how you can view this data in reports to better understand and improve your account's performance. Once your account is up and running, you'll get a wealth of valuable insights!