Tips & Tricks: Making the most of your sidebar in Google Sites
October 12th, 2010 | Published in Google Docs
The sidebar on a Google site helps site visitors find what they are looking for and stays with the user as they navigate the site. Let’s take a look at how you can take advantage of this space.
For example, let’s say you’ve gone on a few trips this summer, and you want to create a site to organize and document your travels. You want each destination linked on the sidebar of your travelogue site.
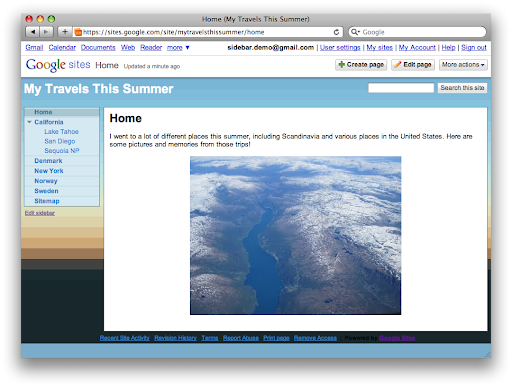 To access the sidebar menu, go to More actions > Manage site > Site layout (you can also click the Edit sidebar link under your sidebar).
Rearranging order of the links
By default, Google Sites organizes links in alphabetical order, but you can also arrange the pages in the order you visited them.
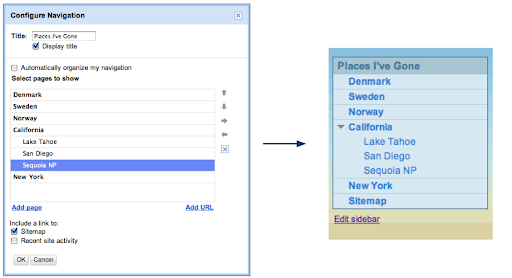
Click the Edit link within the Navigation box. In the Configure Navigation window, uncheck the box next to ‘Automatically organize my navigation.’ Next, add your pages manually (with the Add page link) and rearrange them with the arrows on the right. The up-down arrows change the order of the pages, and the left-right arrows allow you “indent” a page within another, making it a subpage.
Resizing the sidebar
You can also control the width of the sidebar via Site layout > Change site layout and entering in a new width.
 Changing the color of the font
There’s also flexibility when it comes to changing the colors of the text in the sidebar. To find these settings, go to More actions > Manage site > Colors and Fonts.
 Adding email addresses or links to other sites
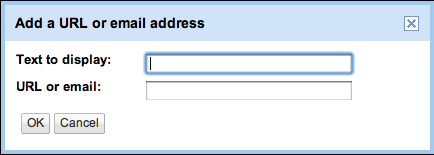
If your travel buddies have their own websites, and you’d like to link to them from yours, you could add external links to your sidebar. Go to Site layout and edit the Navigation box. In the Configure Navigation window, select Add URL and enter in a URL and text to display.
Adding text and images
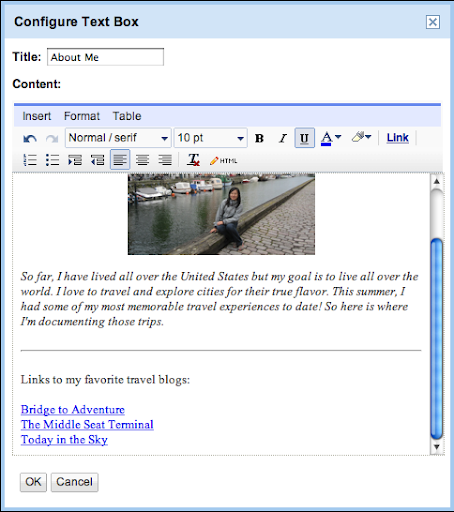
After you’ve reordered and added external links to your sidebar, you may decide that you’d like to add some information about yourself to your site. Since you can add and format text to the sidebar, as well as insert images and links, it’s easy to create a bio profile. Simply go to Site layout > Add a new sidebar item > Text.
Horizontal navigation
After adding the bio, you notice that the sidebar area got a little crowded. Luckily, there’s a new feature called horizontal navigation that allows you to move your navigation links to across the top of the site.
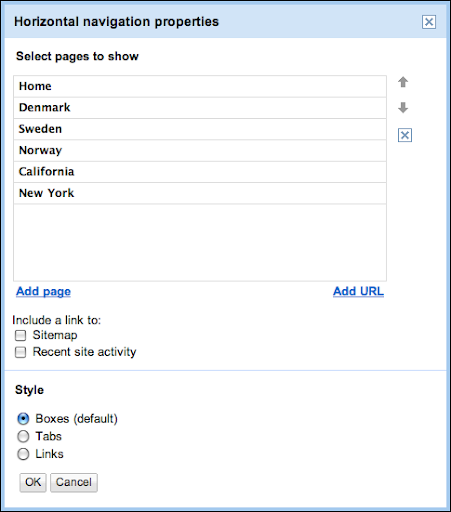 Go to Site layout > Change site layout and check the box next to Horizontal navigation bar. A new section on the site layout preview will pop up, called “Horizontal navigation bar.” You can customize the horizontal navigation bar the same way you reorganized the links earlier.
Let’s take a look at the result:
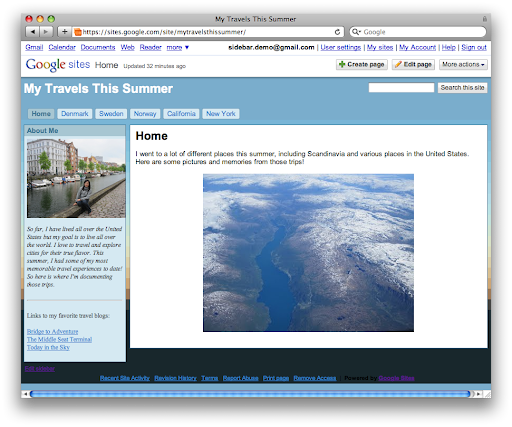 The Google Sites team will be adding some new functionality to horizontal navigation soon, so look out for that announcement on this blog.
For example, let’s say you’ve gone on a few trips this summer, and you want to create a site to organize and document your travels. You want each destination linked on the sidebar of your travelogue site.
 To access the sidebar menu, go to More actions > Manage site > Site layout (you can also click the Edit sidebar link under your sidebar).
Rearranging order of the links
By default, Google Sites organizes links in alphabetical order, but you can also arrange the pages in the order you visited them.
Click the Edit link within the Navigation box. In the Configure Navigation window, uncheck the box next to ‘Automatically organize my navigation.’ Next, add your pages manually (with the Add page link) and rearrange them with the arrows on the right. The up-down arrows change the order of the pages, and the left-right arrows allow you “indent” a page within another, making it a subpage.

Resizing the sidebar
You can also control the width of the sidebar via Site layout > Change site layout and entering in a new width.
 Changing the color of the font
There’s also flexibility when it comes to changing the colors of the text in the sidebar. To find these settings, go to More actions > Manage site > Colors and Fonts.
 Adding email addresses or links to other sites
If your travel buddies have their own websites, and you’d like to link to them from yours, you could add external links to your sidebar. Go to Site layout and edit the Navigation box. In the Configure Navigation window, select Add URL and enter in a URL and text to display.

Adding text and images
After you’ve reordered and added external links to your sidebar, you may decide that you’d like to add some information about yourself to your site. Since you can add and format text to the sidebar, as well as insert images and links, it’s easy to create a bio profile. Simply go to Site layout > Add a new sidebar item > Text.

Horizontal navigation
After adding the bio, you notice that the sidebar area got a little crowded. Luckily, there’s a new feature called horizontal navigation that allows you to move your navigation links to across the top of the site.
 Go to Site layout > Change site layout and check the box next to Horizontal navigation bar. A new section on the site layout preview will pop up, called “Horizontal navigation bar.” You can customize the horizontal navigation bar the same way you reorganized the links earlier.
Let’s take a look at the result:
 The Google Sites team will be adding some new functionality to horizontal navigation soon, so look out for that announcement on this blog.